Daily Lesson Plan for a Struggling Reader©
5 steps-45 minutes-4 days a week
Dianne Craft “Right Brain” Learning System
(Download the lesson plan HERE)
This Daily Lesson Plan was developed for children who are more than a year behind in reading. This is the step-by-step program that Dianne Craft, as a special education teacher, used for 17 years in her Reading Resource room to achieve approximately two years’ growth in reading in her students in one year. This is also the plan that given to new special education teachers in Dianne’s graduate level courses. If you follow each of these steps, four days a week, with your struggling learner, you will cover all the parts of remedial reading and should see very consistent results. Be sure to give the Quick Word Recognition Placement Test or something similar every three months to assess your progress. If you start the Daily Lesson Plan step-by-step program in September, by January your child will know significantly more words in the Quick Word Recognition Placement and in his daily reading. The Daily Lesson Plan does not leave out any of the critical parts of reading remediation. It is so important for you, the teacher, not to become discouraged in the beginning months and decide that all your work is not “working”. After Christmas is the time when you will begin to see some measureable results, and then the reading will become easier each month.
Reading Session (45 minutes…less for younger kids or non-readers)
This combination of Brain Training exercises and Phonetic one-on-one intensive tutoring really pays off at the end of the year. If you are diligent, you will see tremendous results by the end of the year…for very little financial output…but diligence on your part!
This one-on-one teaching session includes 5 steps:
1. Brain Integration exercises 4 days a week (See “What about the 5thday?” at the end of document.)
2. Decoding Practice (phonics without rules or writing)
3. Right Brain Sight Word practice
4. Pre-Reading
5. Oral Reading
STEP ONE:Brain Integration Therapy Exercises
Following your Brain Integration Therapy Manual, do the daily midline exercises at beginning of the reading session to stimulate good integration between the right and left brain hemispheres. These midline exercises do not need to be done in any specific order or time of the day, but many parents and teachers like to start their day with the midline exercises or spread them out throughout their teaching sessions.
STEP TWO: Decoding Practice (15-20 minutes, depending on age of child…set the timer!)
Following your Right Brain Phonics Book (Right Brain Orton- Gillingham), and using the Right Brain Phonics Cards, have the child sound out words in which the “decoding unit” has been put in color for greater retention. Refer to the phoneme picture on the reading page with the decoding units (au/aw; oi/oy; ar; ou/ow) IMBEDDED on the picture that gives that sound. This puts the left brain sound on the right brain picture, helping the child easily impress the sound unit in his/her brain. For example, the sound au/aw is imbedded on the picture of the saw, demanding less energy from their auditory memory.
Keep your phonics cards on the table each day for easy reference. Reading (actually sounding out) lists of words in color is the most important part of this remedial program. Have the child sound out the words, using the cards if necessary, until the timer goes off. When presenting these phonics sounds in real words with a small class, or individually, have the child sound out the words from these colored word lists for 15 or 20 minutes. The next day, the child will read the same pages again(no writing). Then the following day, read the same pages, maybe adding one more lists of words, if the child finishes before the timer goes off. Follow this pattern for the week. We are notlooking for “mastery” here, but just to expose the child’s internal camera to these words. Having to sound them out each day is not unusual. As I consistently continued this pattern of working on sounds in whole words all year, by the end of the year the children were reading words they never thought they could read. Using this reading program along with the Brain Integration exercises, a two-year increase in reading skills was often achieved in one year. I have seen this happen many times in my teaching years. Be sure to use the “Quick Word Recognition Grade Placement” every three months, to assess growth.
Remember that if your child sounds out a word incorrectly, your comment is “could be”; then you bring out the picture phonics card of that sound for him to consider, or you write it out larger and put the hard part of the word in color. For example, if the syllable “jec” as in the word “objection” is very hard to get, then you write out “jek” on a different piece of paper and have him sound that out. Then change the “jek” to “jec” and have him say that. If he tries to “guess” at the words, then take a card and only expose one syllable of the word at a time. If he is still guessing, then “back out of the word”, reading the last syllable first. When all the syllables have been read independently, then have him read it forward.
After a child has read all the pieces of a word, have him say it as a whole word and talk about the meaning of the word, if it is not familiar. For example, when reading the word “con spire”,the child might say “con spir”. Your response is, “could be…” and then highlight the “e” and “i” in the same color. Remind him that the “Power Ranger ‘E’” has the power to make the preceding vowel say its own alphabet name. Write “ire” separately and have him sound that out. Then “back out” of the word and have him put the “p” in front of the sound of “ire”. Then have him put the “s” sound in front of the sound “pire”. Then he can sound out the whole word. Then you can talk about the meaning of the word.
This process of “backing out of a word” works extremely well for a child who is having trouble with blends (spr; gl), as is the case with auditory processing problems. Start at the back of the word, and then later read the sounds forward. That way, the errant sounds that have “glued” in your child’s head, are actually deleted, just as a word on the computer screen would be. It is best not to use verbal “cues” (rules) when teaching , but instead use pictures, color, and re-writing the hard part of a word on a large piece of paper. This helps the child build “scaffolding” to figure out a word. Then the child discovers” the connections and will have the necessary skills to apply that method to the other words he reads.
This process of independence does not occur overnight, but it absolutely will occurif you are faithful NOT TO GIVE VERBAL CUES (“RULES”) but rather visual ones…looking at the phonics cards with the sounds directly on the picture that gives that sound. Remember that this child has an auditory processing problem, and verbal cues do not stick. That is why the regular phonics programs have not worked for this child, even though they work for other children. You will be rewarded with a look of satisfaction on the child’s face when they have figured out the word themselves, using these steps.
This process of reading words out of context with the decoding unit in color should take about 20 minutes of your daily remedial reading time (depending on the age of the child). Don’t skimp on this time. The accumulation of words in the child’s memory bank only occurs with consistent, daily work on words.
STEP THREE: Teach Sight Words
Use your Right Brain Sight Word Cards or your homemade sight word cards. If your child is a beginning reader, then you will need to teach Sight Words in a way that will actually stick. That means that we will have to use something other than black and white words and repetition. Repetition, even on a trampoline, or doing hop scotch, or using gimmicks such as a flashlight, etc., does not work well with these struggling readers who are two years behind. These repetitive methods only seem to work with children who have milder struggles. The key to getting those pesky sight words to stick easily is to use a unique process of teaching where we imbed meaning onto the sight word.This is all done in rich color, on a card. After the child takes a picture of the word with the name imprinted on it in picture form, you can then present the word in black and white, and they will “see” in their mind’s eye the picture that gives them the name of the word. This is a VERY effective method, even though it is much more involved than the other methods you may have used before. To see how this method is done with Sight Words, look at the examples Dianne shares in her short YouTube demonstration video. This will show you how to use this process with your child at home, to finally make sight words stick without a struggle.
Many times I have worked with a child who could not read one word. At the end of a one-hour tutoring session, this child could read at least seven words using this unique picture/color imbedding method.
When I taught, I would introduce about five words in this manner on Monday, and review them each day of the week. I would put them up high in the room, so their eyes have to look up to see them, stimulating their right brain which is in charge of storing pictures and is the site of our long-term memory storage. The next week I would introduce five more words. If you can teach more than five sight words a week, teach as many as you can, but remember to review them carefully for five days so they will stick. Eventually you will have stimulated the child’s visual memory, so that you will not have to teach sight words in this painstaking manner. But at first it is a lifeline for the child, since they will become proficient readers in a very short time. You will find that your child can easily spell these sight words, once he can read them, using this specific method of imbedding. After you have done 3-4 months of once-a-week Brain Training Sessions along with the daily exercises, all of this will get easier because you are making so many more brain connections with all that midline activity.
Where do I get the Sight Words?
If you are using the Craft Right Brain Readers (First and Second grade) with the attached Right Brain Sight Word Cards for that Reader, you can use those cards. If you are using other readers, you will have to make your own Sight Word cards, or order our new 220 Craft Right Brain DOLCH Sight Word Cards. These cards cover all the Sight Words a child will need to learn through third grade. These zany cards are so easy to remember. Your child will be thrilled to learn them so fast!
STEP FOUR: Pre-Reading (VERY IMPORTANT)
We want to view oral reading as a piano recital. The audience is the child, as he constantly assesses how he sounds when he reads. Just as a piano piece is practiced many times before a recital, so the words in a passage to be read will be practiced in isolation before the reading. As the child’s teacher, you will need to quickly peruse the reading passage and then make a list of all the difficult or “tricky” words in the reading passage. You will decide what these tricky words are from your knowledge of your child. It may not be any of the words that were pointed out at the beginning of the story by the curriculum authors. Write the words you chose large on a piece of paper with a colored marker. Then you and the child read the words together and review them quickly before the child is about to read. Some words you will help him sound out. Others, like “Sight Words”, you will tell him. Then put a little drawing or something directly on the letters of the Sight Word to help him remember it. Keep these words in front of the child when he is reading from his reader. Point to the word on the paper when he gets stuck reading. It is remarkable how well this works. The child looks at the paper and quickly remembers the word, even if he didn’t remember it in context!
The important thing is that in this way of approaching reading a story from a book, the child will have fewer interruptions in the oral reading process, and he will “sound smart” to himself. If the child hesitates with a word while reading, you can casually point it out to him on the paper. If he still doesn’t get it, then tell it to him. Put the list of tricky words you have made on a “Word Wall”, and practice reading them every day. Or you can store them in a folder to be re-read each day for a week. By the end of the week, you will have about five lists to review daily. By this time the child knows most of them well. The ones that still aren’t sticking, you will need to put some more “velcro” on in terms of a picture or more color that will help him remember the word. You are very effectively depositing words in the child’s “Word Bank” in a way that will stick, enabling him to become a capable reader. You will also see that your child will not resist reading from a reader as much, because he will sound smart, and knows that he will not have to “sound out” the words when he is reading. You will hear a big sigh of relief! You will love this strategy! Your students from first grade to teenagers will feel so good about their reading when you use this pre-reading method. They will also remember so many more words in the upcoming stories!
STEP FIVE: Oral Reading (15 minutes OR the length of a story)
Because these children are all experiencing auditory processing problems, making the learning of sight words hard for them, we can make much greater progress with them by teaching them from a phonetically-based reader that has AS FEW SIGHT WORDS AS POSSIBLE. When a child reads a book with many sight words, he will either try to sound out all of the sight words, or have you tell him the words, or just guess at the words. That is a very defeating way to read. Careful choice of a reader can make a huge difference for a struggling child. Choose a reader that has very few of these stumbling block words at first, to help the child feel independent and successful in reading.
You want to use a reader that will bring the least amount of frustration. The most success I have had in teaching dyslexic children, and other struggling readers, is by using the Craft Right Brain Readers. These readers have the fewest new sight words in them of anyreading program I have seen for struggling readers. Using these remedial readers, the child/teen can sound out just about every word in the book. These readers have no pictures so that the child will not use the pictures to “guess” at the words, but rather will use the phonetic clues. The stories in these readers do not move too quickly. They are carefully designed not to introduce too many new words (especially sight words), as almost all other reading programs do. Using a specially formulated sequence of words to ensure success, the readers also have all the new Sight Words already made into Picture Cards for you. Students love these cards, as they find that they can not only remember the Sight Words easily, but they can spell them also, since they go directly into their Photographic Memory. These readers remediate reading through the end of the second grade level. If your child tests at the beginning of the third grade level, my recommendation is to get the two third grade phonetic readers from Merrill Readers. (Can purchase these readers inexpensively on Thrifty Books, Ebay, and Amazon. Or you can purchase them in new condition from Rainbow Resources.) These readers also introduce new words slowly, but they do not have the sight words with pictures made for you. You and your child will need to make them for each story.
Daily, have your child/teen read a story aloud, using the all-important Pre-Reading method as spoken of above. Do not re-read stories in these readers. There is so much repetition already. Move on to a next story each day.
Specialized Decodable Readers: CRAFT RIGHT BRAIN READERS
This Orton-Gillingham based structured reading series was created for ultimate success for very struggling readers who cannot remember sight words easily and get confused when too many new sounds are introduced. The reading series was designed for predictable success with children for whom no other reading books have worked, such as students with dyslexia, or dyslexic-like symptoms. The readers come with the Right Brain Sight Words Cards presented using a picture/story method, with the meaning imbedded right on the word. For Reading Levels 1st grade through the end of 2nd grade (no matter what the student’s age).
I call them “The Boring Little Books That Always Work!”
These Craft Right Brain Readers come with a Blue and Green Colored Reading Transparency to immediately take the stress off of a child’s visual system while reading. These colored reading transparencies relax their eyes and greatly reduces reversals, skipping of words, and keep words from moving on the page while they read.
The first reader in the Craft Right Brain Readers, designed for the very struggling reader, is AT BAT. In this book, only the short sound of “a” is in the stories, along with a bare minimum of sight words. The stories are simple, but very rewarding for the child/teen who can read this book semi-independently because of the accompanying Right Brain Sight Words Cards with picture clues. The next book is THE BIG WIN. This book uses the now familiar short “a” words, and adds the short “i” and “u” words. The whole book contains stories using only these three vowel sounds (no blends, no long vowel sounds, and about 20 sight words), so the child is not pushed too fast and continues to build on success. The last 1st grade reader is YOU ROCK. The 2nd grade readers are: LOOKING UP; THINK BIG; GRAND SLAM; GAME ON. You will see great success with these carefully created readers. This is a totally different approach to reading than your students have used before. For a Fast Placement Test to see which of the readers would be best for your child to start in, download this Craft Right Brain Reader Placement Test.
Why Right Brain Readers—while there are many other readers that have “Nat, the Cat” type of titles, you will find that they introduce too many sight words and phonics sounds for these very struggling learners to read comfortably. They soon lead to frustration and one more reading book to put on the shelf. With the Sight Words and Phonics Sounds imbedded with picture and color, you will see the vast difference between this Right Brain approach and other approaches as soon as you have your child read the first story!
MERRILL READERS
When the student has finished the last of the 2nd grade Craft Right Brain Readers, GAME ON, it is an easy transition for them to go into another phonetic reader like the Merrill third grade readers, Take Flight and Breakthrough. (You can usually get these ‘used’ from Thrifty Books, Ebay and amazon or new from www.rainbowresources.com.)
When the child/teen is finished with those two remedial readers, they are then ready to launch into reading books from any other publisher, because they will have a large base of words that they already know. Some fourth grade readers that are “user-friendly” for these kids/teens are Pathway Readers, Ginn Basal Readers, or Bob Jones Readers (all available online for ordering). Be sure to do the Pre-Reading of tricky words first, whichever level of reader you are using. This will continue to increase the student’s reading vocabulary in the easiest way possible.
Ongoing Assessment—Every 3 months or so, use the Quick Word Recognition Placement Test to continue to monitor your child’s progress. This is the most exciting part of the program (after the first three “grinding” months). You will see how quickly they will make the two-year leap in reading in one year.
Reading Comprehension Training
(Many children do not need this step. But if you have a child who can read the passage well, but cannot remember what he has just read…then show him how to make a ‘movie in his head’ while he is reading) Read Dianne’s article “When a Child Doesn’t Remember What He Reads”.
If the child you are working with can read a passage well, but does not remember what has been read, then it would be very helpful to do this Reading Comprehension Training with that child. Take five-ten minutes each day to train the child to “convert words to pictures”, which is what reading comprehension is all about. Have the child sit facing you, with his eyes in an upward position, ready to make a “movie” or pictures of a reading passage in his head. Read a short, descriptive passage, stopping after each sentence, inquiring about the picture the child has made. Make sure the child includes the colors, size, location, etc. After you have read the entire passage aloud, “rewind” the film and have the child tell you all the pictures they have. This daily practice will bring powerful results!
To see a demonstration of this very effective technique, you can order the “Teaching the Right Brain Child” DVD, and receive a teaching manual with it. The Visual Spelling technique is on that video also, as is Right Brain Phonics, Vocabulary, Math, Right Brain Study Skills, Sight Words, and more.
What about the fifth day of the week?
Following your Brain Integration Therapy Manual, once a week only, take twenty minutes and do the “Brain Training” for the Visual system, Writing system, or Auditory system. This begins to remove the LEARNING BLOCKS the child is experiencing; so all learning becomes so much easier. This is a remarkable method to remove LEARNING BLOCKS, so be faithful with the daily midline exercises four days a week, and the once-a-week Brain Trainings. Both the exercises and brain training should not take more than 20 minutes total. Here’s a quick breakdown of your Brain Integration therapy Schedule:
Monday-Thursday (or the four days of the week you choose) 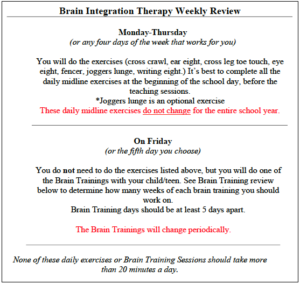
· You will do all six midline exercises outlined on page 65 of your Manual.
· This is the order I followed in my resource room and consultation practice: Cross crawl, Ear eight, Cross leg toe touch, Eye eight, Fencer, and Writing eight.
· This schedule Monday-Thursday does not change all year.
Friday (or the fifth day of the week you choose) 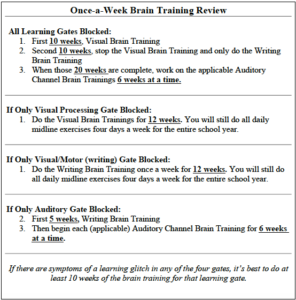
· You will not do the midline exercises separately, but only follow the 7 steps of the Brain Training.
· This is the best plan to follow with the brain training:
o First Ten Weeks: Visual brain Training once a week
o Second Ten Weeks: Writing Brain Training once a week
o After Those 20 Weeks are Complete: work on the Auditory Brain Training. You will follow the Auditory Brain Training steps, but switch the activity every 6 weeks to the auditory channel you are unblocking. Work on each channel for 6 weeks at a time.
**Please don’t be daunted by the number of weeks for the auditory brain trainings.In our experience, when we spend enough time in the Visual and Visual/Motor Processing Brain Trainings, we don’t always have to do as many Auditory Processing Brain Trainings. So many connections are being made; the brain finds a way to correct many of the Auditory Processing problems. So we often end up not needing to do all of the weeks of the Auditory Processing Brain Trainings. Many of the symptoms resolve themselves even before you get to that specific Brain Training session. On the other hand, beware of making promises as to when your child will be “done”. You will make much progress the first year, but when a child has a more severe Auditory Processing issue, it is usually necessary to continue therapy into a second school year to pull everything up to or above grade level.
The daily exercises do not change the whole year. The Brain Trainings will change periodically.
Copyright © Dianne Craft “Right Brain” Learning System, Child Diagnostics, Inc.
Quick Word Recognition Placement Test with Instructions