Daily Lesson Plan for the Struggling Writer and Speller
Created by Dianne Craft, MA, CNHP
The steps below were carefully designed by Dianne Craft in both her resource room settings and consultation settings. Parents, teachers and tutors can easily integrate these steps to help their struggling writer and speller get caught up to grade level in one school year.
*If you are using Dianne’s whole Brain Integration Therapy Program, you can do the writing eight exercise (step 1) at any time during the day with the other five midline exercises, 4 days a week.
Writing Session (30-45 minutes)
* 1.“Writing 8” Exercise (15 minutes)
Do the “writing eight” exercise, doing the whole alphabet each day…monitor closely for best results and do for the entire year. The writing eight exercise (As described in the Brain Integration Therapy Manual) transfers the process of writing from the left, “thinking” hemisphere, to the right “automatic” hemisphere, making the writing process MUCH easier. It also eliminates reversals in writing. Be consistent with this, and you will see spectacular results in the ease of writing. Do as much of this exercise that you can in a 15-minute time spot. If that isn’t the whole alphabet each day, then continue where you left off the day before. After a while the whole alphabet will be able to be done in 15 minutes.
*****DO THE ONCE A WEEK WRITING BRAIN TRAINING AS ILLUSTRATED IN THE BRAIN INTEGRATION THERAPY MANUAL if you don’t see a big difference in the ease of writing using just the writing eight exercise, carefully monitored by you, 4 days a week for six months. *****
For a demonstration of how to do this remarkable Writing Eight exercise for your child, order the “Smart Kids Who Hate to Write” DVD by Dianne Craft. This DVD explains Dysgraphia and writing glitches thoroughly, and shows you the corrections clearly. Students of all ages, 5-17 are shown doing the exercise.
2. Handwriting Practice
In classrooms and homes across the country, teachers and parents are discovering that no additional handwriting practice is necessary.You can teach pre-schoolers, kindergartners and primary children how to initially write their letters using the writing eight as the template. This way you effectively eliminate the potential of writing reversals, also. If you want to teach cursive to a child, or teenager, be sure that they have done a minimum of 3 months of the writing eight before they begin. Otherwise, for a bright but spatially challenged or dysgraphic student cursive is torture. We can eliminate this problem by the careful, monitored writing exercisedaily.
3. Spelling
Do not teach spelling using the “writing gate” or the “auditory gate”, as these gates are generally blocked in bright, but struggling children. Rather, teach them how to use their “photographic memory” to easily store spelling words in their long-term memory. They feel really smart when you they learn this way. It may seem like more work at first, but it is immensely successful and much more fun for you and for the child. It will become much easier as you go along through the year.
Using the 1200 Most Commonly Used Words, and words from the words from their daily writing that they have misspelled, (not words from a regular Spelling Book), on Monday of each week, give the child a pre-testto find out which words aren’t known, to make your spelling list for the week. Since many of these bright youngsters have a “writing glitch”, give them the test orally. You can write the words for them if you want. This way you’ll really find out which words they don’t know, not which words they could write correctly.
Remember, that with a writing glitch kids often inadvertently leave out a letter in a word when they write it. When you have identified between 10-15 words that the child doesn’t know, (these words can also be taken from the papers they write), make up cards for these words, working with your child. On the cards, write the letters that they spelled correctly in black magic marker. Write the letters they misspelled in color. You often have to put a picture on those tricky letters. For example, in the word “Saturday”, have the “u” be a swimming pool with a stick figure person diving into it. You can glue stars, marshmallows, m & m’s, etc. on letters that don’t want to stick in the memory. At first the cards will be quite elaborate as you are training your child to use his/her photographic memory. After several weeks, you will find that you need to put less and less on the words, and the child still remembers it.
Once the cards are made, have your child sit in a chair with his/her eyes in an upward position. Put the card up high in the air, and point out a few letters or pictures, and direct the child to take a quick “snapshot” with his eyes. Do this for “five looks”. Then take it down and ask questions about the colors and pictures of the letters. Then ask the child to spell the word forwards and backwards. BACKWARDS spelling is extremely important to this process. If the child can’t easily spell the word backwards, he isn’t seeing a picture of it, and the word will quickly fade in his memory, even if he passes the weekly test. If the child continues to get a letter wrong, then put more “jazz” on that letter…using either more pictures, or a silly story. If you are working with only one child, you can do this process for every word, every day. Then take the test on Friday. Remember, that if the child is struggling with the word, always direct her eyes upward to access the photographic memory. If she is still struggling, then offer some visual clues, like “What are the colors of the letters?” The colors often will pull up the letters on their screen. If you are teaching more than one child, after showing the cards individually on Monday, you can put the spelling cards up high on a wall that the child looks at regularly throughout the day. Each day, have her turn her back on the cards and tell you colors, pictures, and how to spell each word forwards and backwards. Remember, if a certain letter continues to be hard to recall in a word, you will need to put more “velcro” or “glue” on the word using weird, emotions, humor, color, etc. Then it will stick. Often the child can come up with these extra crazy visualcues.
***Be sure to have the child take a ‘picture’ of each word 5 days in a row***
You can put the words high on a wall. Each day, you have them look up at the word, and then look at a blank wall, and tell you the colors and pictures on the card. Then they spell the word forwards and backwards. Do this spelling process each day for 5 days, for each card. No writing is necessary except on your spelling test day.
As the year progresses, the child can write the spelling words in good sentences each week, also, as the writing process becomes easier by the daily writing eight exercise. You can do this sight word spelling program along with any Phonics based spelling program, also.
This very effective Right Brain Spelling Strategy/Photographic Memory, along with Right Brain Strategies for teaching Math, Vocabulary, Phonics and Study Skills is clearly demonstrated in the Teaching the Right Brain Child DVD.
Some mothers and teachers make the mistake of making the spelling words on small, index-size cards, and use light, pastel colors for the letters, or make every letter in a different color, giving the child no “pattern” to take a picture of. This consistently leads to failure to store the words in the long-term memory. The child will only remember the words long enough to pass the end of the week spelling test. This, of course, is not our goal. Remember, BIG, BOLD, PATTERNS, and funny if necessary for memory grips. Strong Visual Velcro is what we need.
4. Paragraph Writing
It is important that your child writes at least one “paper” a week. For younger students (grades 1-3) this will consist of a short paragraph. For intermediate students it will consist of much longer paragraphs, and then multiple paragraphing. Our goal, in this remedial writing program, is for each intermediate age child (4-8) is to write a four page paper by Christmas, and a six page paper by the end of the year. This will require weekly writing assignments that are carefully structured and sequenced to make the child successful with each step.
I use my Craft Right Brain Writing Program that I created specifically for kids and teenagers who needed more structure to write sentences, paragraphs, and papers. I created this easy to use writing method when I was teaching bright, hard working students in a Remedial Language Arts program. Whatever the age of the child I will start with writing very good sentences, then paragraphs and then multiple paragraphs. This can only be accomplished with MUCH adult involvement. Using a BLANK PIECE OF PAPER, (not a workbook page or worksheet), help the child use the webbing process to build a paragraph. This is not the “typical webbing” that most people are used to. It uniquely leads the student to see the “whole” paragraph or paper before he/she even begins writing it.
After your child is writing paragraphs easily, and with a good order and flow, you can change to any “regular” writing program. There are many available that will show a child how to do persuasive writing, expository writing, etc. Your child will now have gotten out of the “no writing hole” and you can proceed at a regular pace of writing instruction that most curriculums follow. This will be one of your most satisfying experiences when you see the final product…a writing child after a year of using these remedial writing techniques. After the child has gotten very good at webbing, and writing good paragraphs, you can proceed to use any good writing curriculum that you have.
The detailed, printed step-by-step Instructional Booklet on how to use this easy writing method (no re-writes… the kids love that part), is included with the DVD, “Right Brain Paragraph and Composition Writing”. This Right Brain Writing program is available on our website for only $19.95. After using this program for an entire year with my students, the next year, they were able to use any other writing curricula that was available, since they were now “pros” at writing!
5. Grammar
Teaching grammar in isolation doesn’t appear to be very effective for these students. The best way to teach capitalization, punctuation and parts of speech, is in the paragraph writing process. However, you can teach contractions, etc. using any grammar booklet. Just make sure that you don’t “major in the minor”. We can avoid this by only teaching grammar about six weeks out of the schoolyear,and doing no more. Rely on the writing program to shape their grammar. Easy Grammar, or the Winston Grammar Kit are good programs. Just remember, that for these learners, grammar practice does not necessarilyconvert into good writing of paragraphs orcompositions.
6. Vocabulary
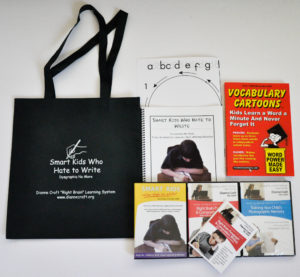
Enrich your child’s vocabulary by teaching them ten words a week from a picture method: Vocabulary Cartoons Series by Sam Burchers. The hilarious presentation of word meanings will stick with your child for a lifetime! These inexpensive, fun vocabulary books can be ordered from the website: www.vocabularycartoons.com
CHECK OUT DIANNE’S NEW DYSGRAPHIA PACKAGE: REMEDIAL LANGUAGE ARTS PROGRAM FOR ONE SCHOOL YEAR.